Get ready for holiday fun with these seven festive art projects perfect for little hands! Create handprint Christmas tree ornaments, paint fluffy snowmen with cotton balls, and make adorable reindeer footprint cards. Shape and decorate salt dough ornaments, craft glittery pinecone elves, and design angelic paper plate decorations. Finally, let those tiny fingers go wild with a colorful finger-painted wreath! These projects are not only jolly and creative but additionally help develop fine motor skills and encourage self-expression. Plus, they make heartwarming keepsakes or gifts for loved ones. Excited to spread some holiday cheer? There's so much more magic waiting to be uncovered!
Creative Highlights
- Handprint Christmas tree ornaments use green paint and children's handprints to create personalized decorations.
- Snowman cotton ball painting offers a mess-free way for toddlers to create winter-themed art.
- Reindeer footprint cards transform children's footprints into adorable holiday greeting cards.
- Salt dough holiday decorations allow kids to shape and paint their own ornaments.
- Glittery pinecone elves combine natural materials with craft supplies for a festive woodland creature.
Handprint Christmas Tree Ornaments
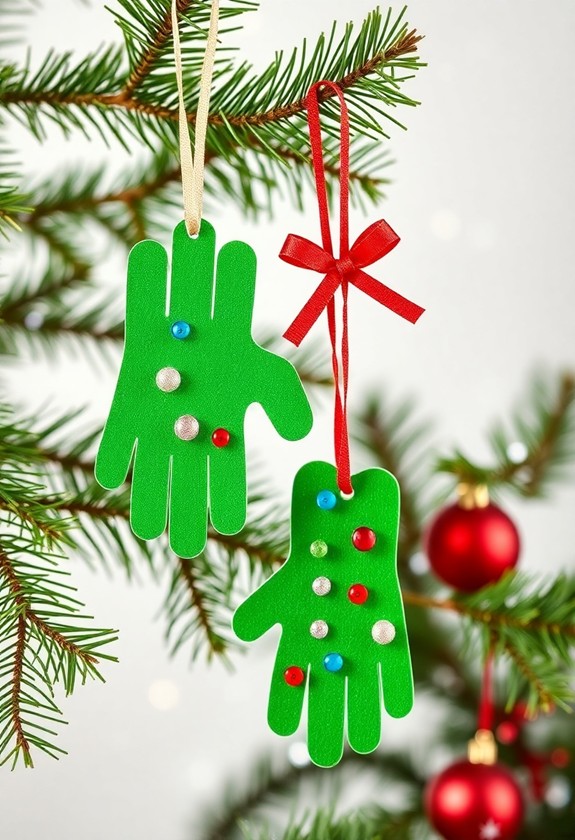
Create cherished keepsakes with handprint Christmas tree ornaments. These adorable decorations are super easy and fun to make! You'll need:
- Green paint
- White paper
- Scissors
- Ribbon
- Glitter (optional)
Start by painting your child's hand green. Press it onto the paper, fingers pointing down. Voila! You've got a tree shape! Let it dry completely. Now, it's time to deck the halls—er, hands! Add colorful "ornaments" using fingertips dipped in different paints. This activity develops fine motor skills and encourages creativity, making it perfect for toddlers. Sprinkle on some glitter for extra sparkle. Cut out the handprint tree and punch a hole at the top. Thread a ribbon through, and you're done!
These hand-some ornaments make perfect gifts for grandparents or teachers. Plus, they're a great way to measure how your little one's hand grows each year. Talk about a palm-some tradition!
Snowman Cotton Ball Painting
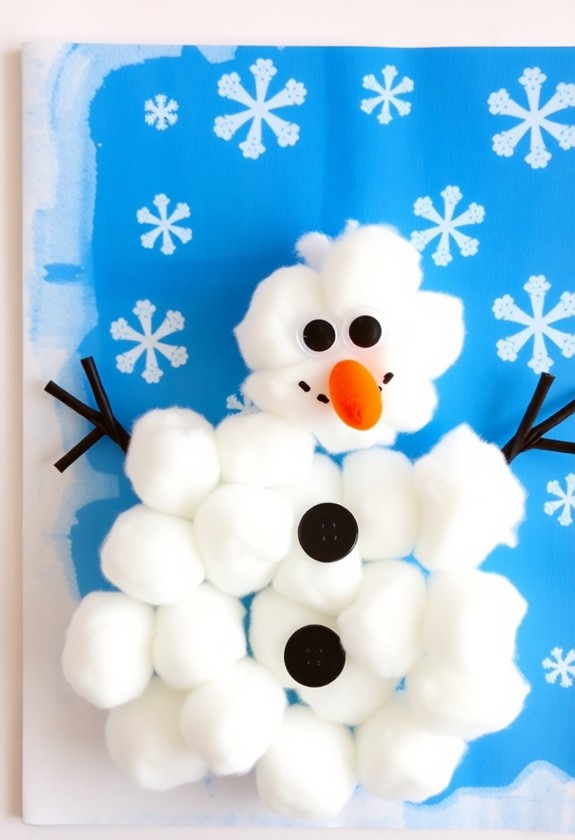
Bring winter indoors with a fun snowman cotton ball painting project. It's a delightful way to get your little ones excited about the snowy season! You'll need white paint, cotton balls, blue construction paper, and some creativity. Let's create a fluffy, frosty friend! This activity not only entertains but additionally enhances fine motor skills and spatial reasoning in toddlers, making it an excellent choice for cognitive development.
Here's how to make your snowman masterpiece:
- Dip cotton balls in white paint
- Dab them onto blue paper to form three circular shapes
- Add details like buttons, eyes, and a carrot nose
- Don't forget a hat and scarf!
This cool activity is snow much fun! Your kids will love getting their hands messy as they bring their snowman to life. And the best part? No cold fingers or wet clothes! It's a win-win for everyone. So, grab your supplies and let's get painting!
Reindeer Footprint Cards

Let's kick off the holiday season with adorable reindeer footprint cards! This fun project turns your little one's foot into a cute reindeer face. Here's what you'll need:
- Brown paint
- Red and black markers
- Paintbrush
- White cardstock
First, paint your child's foot brown and press it onto the cardstock. The heel becomes Rudolph's nose! Once dry, use markers to add eyes, antlers, and a big red nose. Ta-da! You've got a one-of-a-kind reindeer card. This activity is great for enhancing fine motor skills and hand-eye coordination in toddlers, as well as encouraging creative expression.
Want to make it extra special? Add some sparkly glitter for a magical touch. Or, try using different colors for a whole herd of unique reindeer. These cards are guaranteed to sleigh your friends and family! Plus, they're a great way to preserve those tiny footprints as keepsakes. Happy crafting, little elves!
Salt Dough Holiday Decorations

Salt dough ornaments are a timeless holiday craft that children of all ages can enjoy. They're easy to make, fun to decorate, and can become cherished keepsakes! To get started, mix flour, salt, and water to create a pliable dough. Roll it out and use cookie cutters to shape your ornaments. Don't forget to poke a hole for hanging! This activity is perfect for developing fine motor skills and encouraging creativity in toddlers, much like the popular craft kits available today.
Once your shapes are ready, let your imagination run wild! Here are some festive ideas:
- Paint snowmen with glittery scarves
- Create colorful Christmas trees with sequin ornaments
- Craft jolly Santas with cotton ball beards
- Design sparkling snowflakes with glitter glue
After decorating, bake your ornaments until they're hard. Then, thread ribbons through the holes and voila! You've got unique, handmade decorations to hang on your tree or give as gifts. Get ready for a dough-lightful time!
Glittery Pinecone Elves
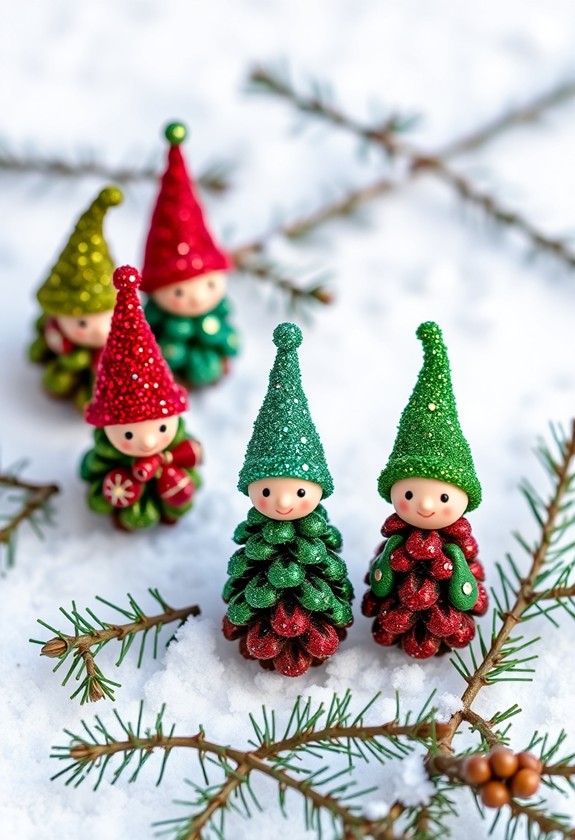
Moving from dough to nature's bounty, pinecones offer an additional delightful canvas for holiday crafting. Let's create some glittery pinecone elves! You'll need:
- Pinecones
- Felt (red and green)
- Googly eyes
- Glue
- Glitter
First, clean your pinecones and let them dry. Then, it's time for the magic to begin! Cut a small triangle from green felt for the hat, and a tiny rectangle from red felt for the body. Glue these onto your pinecone, and watch your elf come to life! Add googly eyes for that mischievous twinkle. This craft is perfect for fostering creativity and developing fine motor skills in toddlers, as well as providing a fun family bonding activity. Now, here comes the fun part – glitter time! Sprinkle some sparkle on your elf's hat and body. Ta-da! You've got yourself a forest full of festive friends. These pine-tastic pals will bring cheer to any holiday scene!
Paper Plate Angel Craft
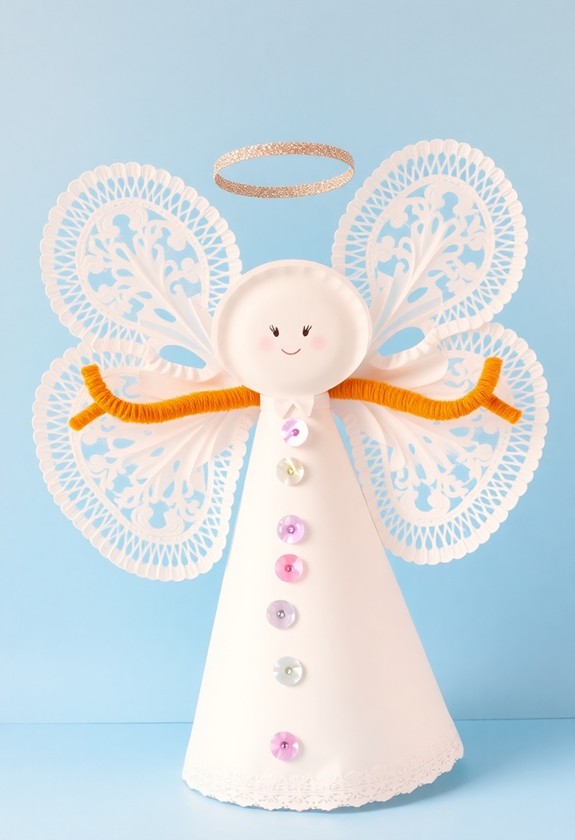
After creating woodland elves, we'll turn our attention to heavenly beings with a paper plate angel craft. This adorable project is perfect for little hands and big imaginations! You'll love how easy it is to transform a simple paper plate into a celestial masterpiece.
Here's what you'll need:
- White paper plate
- Gold or silver glitter
- Cotton balls or white tissue paper
- Markers or crayons
Start by folding the plate in half to create the angel's dress. Then, sprinkle glitter all over for a heavenly sparkle! Cut out wings from another plate and attach them to the back. Use cotton balls or tissue paper to make a fluffy halo. Finally, draw a sweet face on your angel. Voila! You've created a divine decoration that's guaranteed to bring holiday cheer to any room!
Festive Finger Painting Wreath
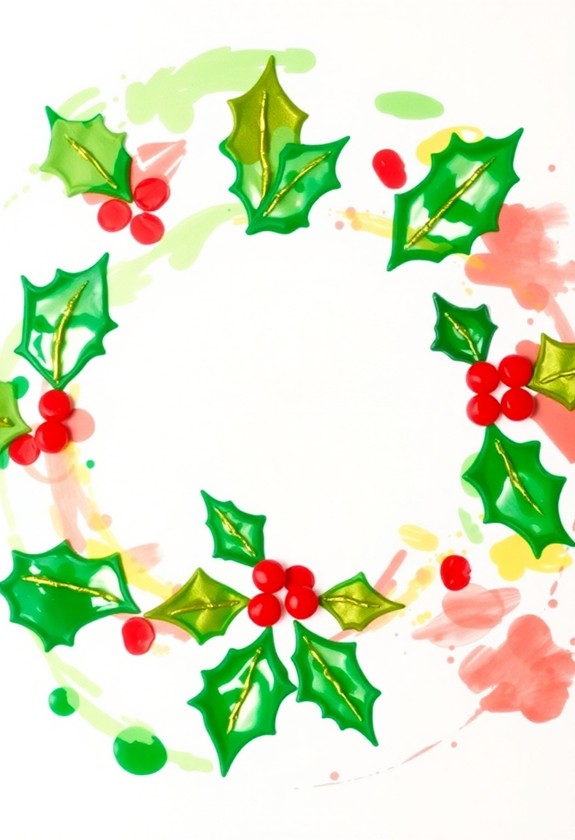
This messy but marvelous project will have your little ones delighting in holiday-themed finger painting. Get ready for a colorful, hands-on adventure!
Here's what you'll need:
- Paper plate (for the wreath base)
- Green, red, and white washable finger paints
- Glitter (optional, but oh-so-festive!)
Let's get painting:
- Cut out the center of the paper plate
- Squirt dollops of paint onto the plate's rim
- Encourage your kids to smear, swirl, and smoosh the paint with their fingers
- Sprinkle some glitter for extra sparkle
Voila! You've got a jolly, one-of-a-kind wreath. Hang it up and watch your little artists beam with pride. It's a holly, jolly masterpiece that'll ring in the holiday cheer!
Curious Little Questions
How Can I Safely Store Handmade Decorations for Next Year?
You've got this, decoration dynamo! To keep your handmade treasures safe for next year's festivities, follow these jolly tips:
- Wrap fragile items in tissue paper or bubble wrap
- Use plastic bins with tight-fitting lids to ward off dampness
- Label each container clearly – no guessing games!
- Store in a cool, dry place away from direct sunlight
- Add silica gel packets to absorb excess humidity
What Age Group Are These Crafts Most Suitable For?
These crafts are perfect for kids aged 4 to 12! You'll find projects that'll delight preschoolers and challenge older children too. For the little ones, try simple tasks like coloring or sticker activities. As for the big kids, they'll love more complex projects involving cutting, gluing, and creating 3D objects. Remember, every child is unique, so you can always adapt projects to suit their skills. It's all about having fun and getting creative during the holiday season!
Are There Any Alternatives for Children With Sensory Sensitivities?
Your little elves with sensory sensitivities can still join the holiday fun! Here are some jolly alternatives:
- Quiet crafts: Paper snowflakes or origami ornaments
- Mess-free options: Sticker mosaics or magnetic tile designs
- Texture-friendly: Soft yarn wreaths or fleece tie blankets
- Light and sound-sensitive: Glow-in-the-dark painting or silent bell decorating
How Can I Involve Older Siblings in These Projects?
Involve your older siblings in these fun projects! They can be awesome helpers and mentors. Here are some great ideas:
- Let them lead: Give big bros and sis a chance to teach the little ones!
- Team up: Create sibling pairs for adorable collaborative art.
- Challenge them: Assign more complex tasks to older kids.
- Make it a competition: Who can make the coolest ornament?
- Photographer role: Let them snap pics of the festive fun.
Embrace their creativity and watch the holiday magic unfold! It's a win-win for everyone!
What Are Some Eco-Friendly Options for Holiday Craft Supplies?
You've got so many eco-friendly options for holiday crafts! Let's get creative and save the planet at the same time:
- Use recycled paper, cardboard, and old magazines
- Try natural materials like pinecones, twigs, and leaves
- Opt for water-based, non-toxic paints and glues
- Repurpose old fabric scraps or clothing
- Choose biodegradable glitter or skip it altogether
Get excited about upcycling! Turn empty jars into sparkling lanterns or transform cardboard boxes into festive decorations. It's amazing what you can do with a little imagination and earth-friendly supplies!