Get ready to release your toddlers' creativity with these 7 awesome recycled art projects! Transform cardboard tubes into adorable animal sculptures, create dazzling mosaics with bottle caps, and craft cute caterpillars from egg cartons. Turn newspapers into stunning collages, make beautiful flower gardens from plastic bottles, and design puppet theaters using cereal boxes. Finally, let your little ones jingle and jangle with yogurt cup wind chimes! These eco-friendly crafts are perfect for developing fine motor skills and teaching sustainability. Plus, they're super fun and easy to do in the classroom. Stick around to find out how these projects can spark imagination and learning in your toddler class!
Creative Highlights
- Cardboard tube animal sculptures teach recycling while enhancing fine motor skills and creativity.
- Bottle cap mosaic pictures promote problem-solving and discussions about shapes, colors, and patterns.
- Egg carton caterpillar crafts provide opportunities for counting, color recognition, and creative variations.
- Newspaper collage masterpieces develop fine motor skills and encourage unique artistic expression.
- Plastic bottle flower gardens teach eco-friendly practices and create beautiful, giftable art projects.
Cardboard Tube Animal Sculptures
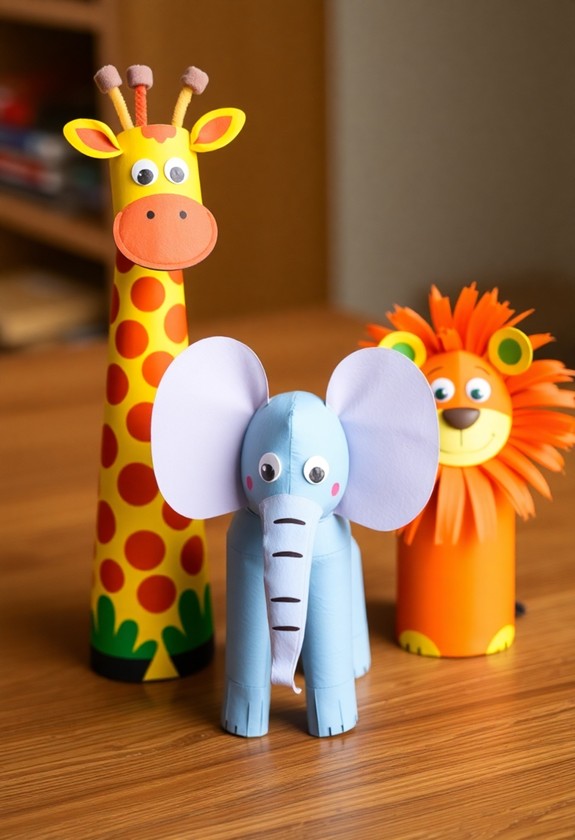
Transform ordinary cardboard tubes into adorable animal sculptures with this simple and engaging project for toddlers. It's a fun way to recycle and release creativity at the same time! This activity not only improves fine motor skills but also stimulates brain regions associated with problem-solving and creativity, making it an excellent choice for toddler development.
Materials needed:
- Cardboard tubes (toilet paper or paper towel rolls)
- Paint and brushes
- Googly eyes
- Glue
- Scissors
- Colorful paper
Instructions:
- Start by painting the tubes in lively colors. Let your little ones go wild with their favorite hues!
- Once dry, it's time to bring these critters to life! Cut out ears, tails, and other features from colorful paper.
- Glue on the paper pieces to create your animal's unique look. Don't forget those googly eyes for extra charm!
- For added flair, use markers to draw on whiskers, spots, or stripes.
Voilà! You've just helped your toddlers turn trash into treasure. These tube-tastic animals are perfect for imaginative play or as delightful decorations. And the best part? You're teaching them about recycling during a fun time! So, get ready to roll with this crafty adventure – it's guaranteed to be a roaring success!
Bottle Cap Mosaic Pictures
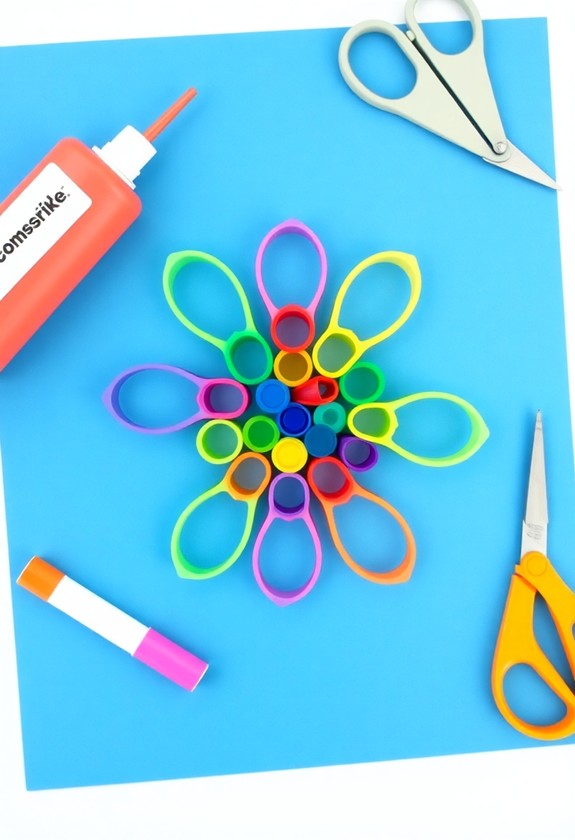
From animal sculptures, let's move on to another engaging recycled art project for toddlers: Bottle Cap Mosaic Pictures. This colorful activity is a fantastic way to turn trash into treasure!
First, gather your materials: clean bottle caps, a sturdy piece of cardboard, and child-safe glue. You'll want a variety of cap colors to make your mosaic pop! Next, help your little artists sketch a simple design on the cardboard. Think big shapes like flowers, houses, or even their favorite animals. This project is perfect for enhancing fine motor skills and promotes creative problem-solving as children decide where to place each cap.
Now comes the fun part! Let your toddlers go wild, sticking those bottle caps onto their design. It's like a puzzle, but way more exciting! Encourage them to mix and match colors for a truly eye-catching creation. And don't worry if it gets a bit messy – that's part of the joy!
As they work, chat about shapes, colors, and patterns. It's learning disguised as play! Once the glue dries, you'll have a beautiful, textured piece of art that's certain to "cap-tivate" everyone who sees it. Plus, you've saved those bottle caps from the landfill – how's that for a win-win?
Egg Carton Caterpillar Crafts
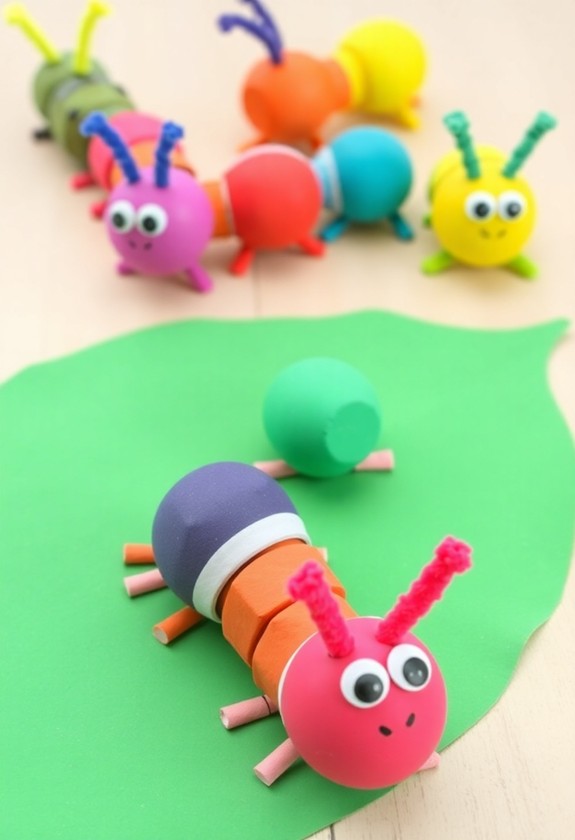
A toddler's imagination can turn the simplest materials into magical creatures. And what's more magical than a wiggly, colorful caterpillar? Let's create one using an everyday egg carton! This craft enhances fine motor skills and encourages problem-solving as children work with various materials. It's additionally a great opportunity for grandparents and grandchildren to bond over a creative activity.
First, grab an empty egg carton and cut it in half lengthwise. You'll use one strip for each caterpillar. Now, it's time to paint! Let your little ones go wild with bright colors. They can make a rainbow caterpillar or stick to their favorite hue. Once the paint's dry, it's googly eye time! Glue them on for that extra touch of whimsy.
Here's where the fun really begins! Add pipe cleaner antennae, pom-pom spots, or even tiny paper wings. The sky's the limit! Want to make it educational? Count the segments together or use it to teach colors.
But wait, there's more! Why stop at caterpillars? Turn that egg carton into a choo-choo train, a row of funny faces, or even a flower garden. With a little creativity, you'll be "egg-static" about all the possibilities! Remember, it's not about perfection – it's about having a crawling good time!
Newspaper Collage Masterpieces
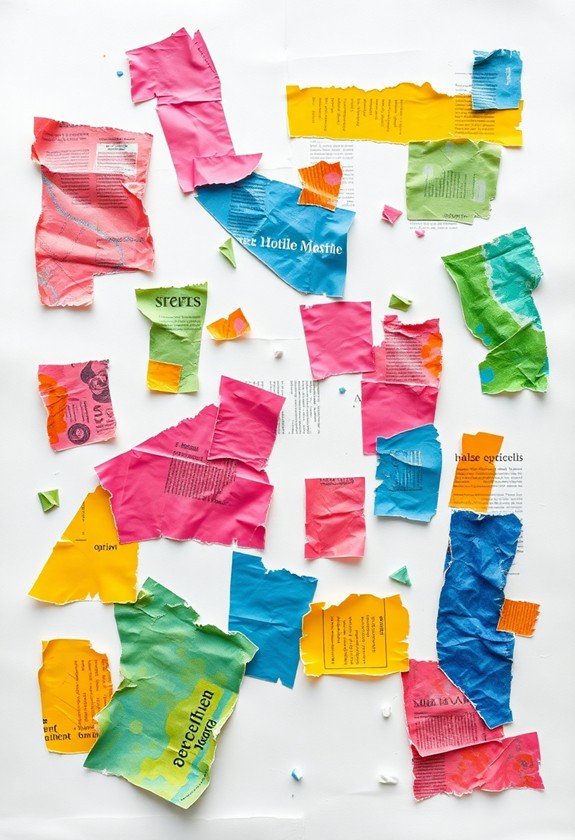
Newspapers often pile up, creating clutter in homes. But don't toss them out just yet! Instead, turn those old papers into amazing newspaper collage masterpieces with your little ones. It's a fun, messy, and creative way to recycle! This activity in addition helps develop fine motor skills and encourages creative thinking in toddlers.
What you'll need:
- Old newspapers
- Colorful magazine pages
- Glue sticks or liquid glue
- Scissors (kid-friendly ones)
- Large sheets of paper or cardboard
Let's get crafty!
First, help your toddlers tear or cut the newspapers and magazines into various shapes and sizes. The more variety, the better! Next, encourage them to arrange their paper pieces on the large sheet. They can create abstract designs, scenes, or even silly faces. Once they're happy with their layout, it's time to stick it all down!
As they glue, remind them to overlap pieces for a layered look. And don't worry about perfection – the messier, the merrier! You can even add some paint splatters or crayon scribbles for extra pizzazz.
Voila! Your little Picassos have turned trash into treasure. These newspaper collages aren't just art – they're "news-worthy" creations!
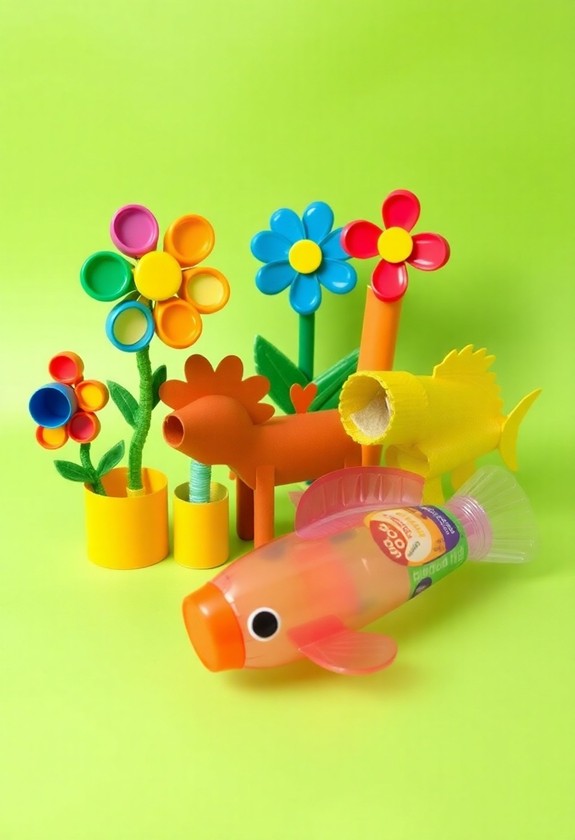
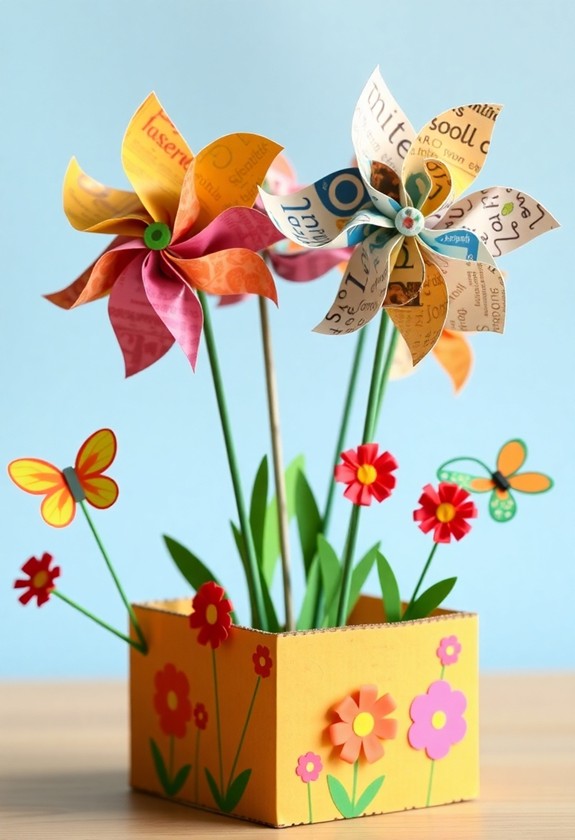
Plastic Bottle Flower Gardens
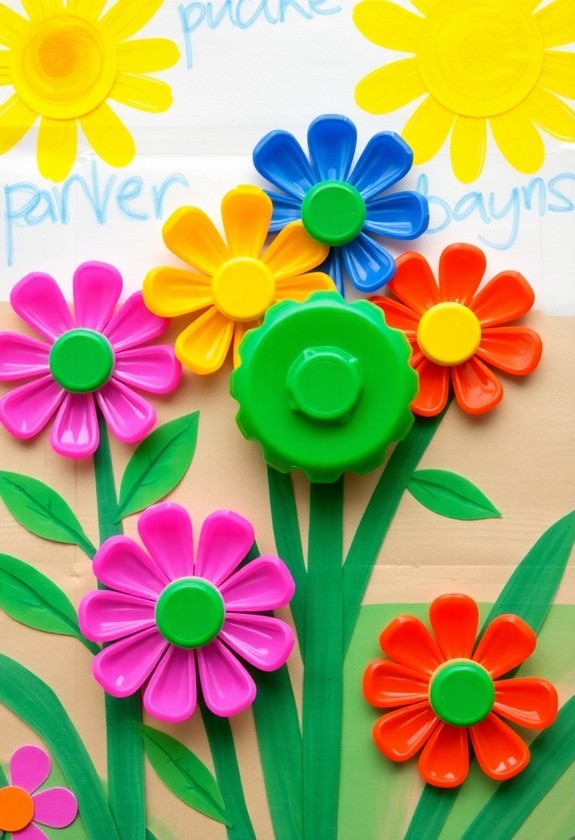
As newspaper art is a hit, let's move on to another household item that's perfect for recycling: plastic bottles. You won't believe how these everyday containers can transform into a beautiful flower garden!
First, gather your supplies: clean plastic bottles, scissors, paint, and decorative items. For improved fine motor skills, consider adding textured art tools like sponges or foam brushes to your supply list. Now, it's time to get crafty! Cut the bottom third of each bottle to create a flower-shaped base. Safety first, so you'll need to help with this step. Next, let your little artists go wild with paint! They can create lively petals, stems, and leaves. Add some sparkle with glitter or stickers for extra pizzazz!
Once the paint's dry, it's planting time! Fill the bottle bases with soil and let your toddlers choose seeds or small plants. Water them gently, and watch your bottle blooms grow!
This project isn't just fun, it's eco-friendly too! You're giving plastic bottles a new lease on life as you teach kids about recycling and nature. Plus, these bottle beauties make perfect gifts for family and friends. Get ready for a garden party like no other!
Cereal Box Puppet Theaters
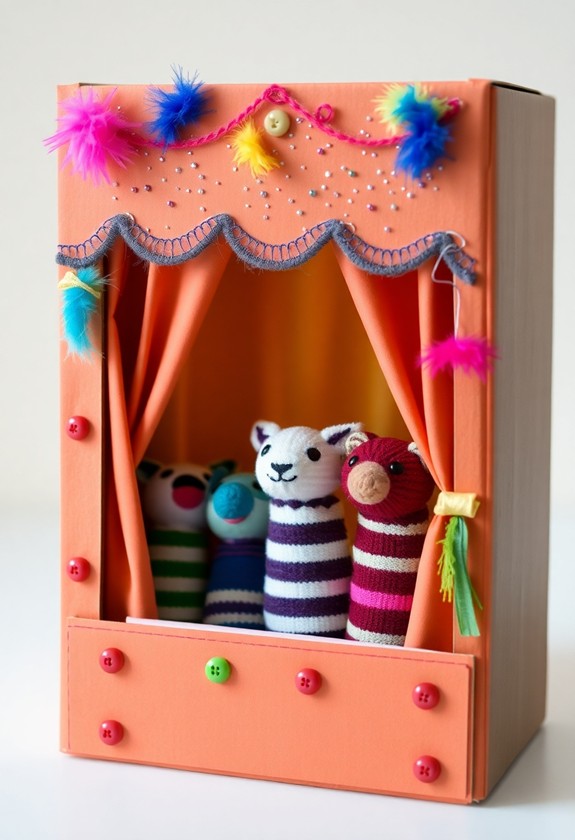
Transforming empty cereal boxes into magical puppet theaters is a fantastic way to spark your toddler's imagination. It's a fun, eco-friendly project that'll have your little ones putting on shows in no time!
First, grab those empty cereal boxes and get ready for some crafty fun! Cut a large rectangle on one side of the box – this'll be your stage. Now, let's decorate! Use markers, crayons, or paint to make it look like a real theater. Add some flair with glitter, stickers, or colorful paper. Don't forget the curtains! Cut some fabric or crepe paper to hang across the top.
Time for the puppets! Use popsicle sticks, socks, or even paper bags to create characters. Your toddlers will love bringing their favorite stories to life!
But wait, there's more! Add a "ticketing area" by cutting a small window on the side. And for extra pizzazz, create a marquee sign for the top. Lights, camera, action! Your cereal box puppet theater is ready for its debut. Break a leg, little stars!
Yogurt Cup Wind Chimes
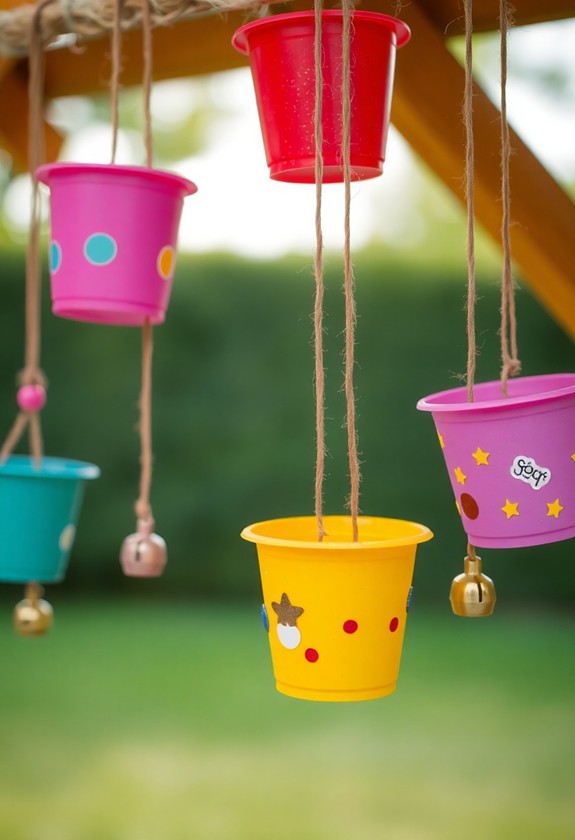
From puppet theaters to musical creations, let's explore another engaging recycled art project for your toddlers. Yogurt cup wind chimes are a fantastic way to turn trash into treasure as creating beautiful music!
Materials needed:
- Empty yogurt cups (washed and dried)
- String or yarn
- Beads, buttons, or small bells
- Paint and brushes
- Hole punch
Instructions:
- Let your little ones paint the cups with bright colors. It's time to get messy and creative!
- Once dry, punch holes around the rim of each cup.
- Cut strings of varying lengths and thread them through the holes.
- Tie beads, buttons, or bells to the ends of the strings. These will be the "chimes" in your wind chime!
- Gather all the strings at the top and tie them together.
Hang your yogurt cup wind chimes outside and watch your toddlers' faces light up as the wind creates a harmony of sounds! This project isn't just fun, it's music to their ears! Plus, it's a great way to teach about recycling and the magic of turning everyday objects into art. Who knew yogurt could be so instrumental in learning?
Curious Little Questions
How Can I Ensure the Recycled Materials Are Safe for Toddlers?
Safety first, crafty friends! You'll want to be super careful with those recycled goodies. Wash everything thoroughly and check for sharp edges or small parts. No icky chemicals allowed! Stick to clean, non-toxic materials like cardboard, paper, and plastic containers. Avoid anything that's been near food or chemicals. And always, always supervise your little artists! With these precautions, you'll be ready for some recycled fun. Remember, when in doubt, throw it out! Your toddlers' safety is worth more than any craft project.
What's the Best Way to Clean Recycled Items Before Use?
Imagine you're a brave knight, battling germs on recycled treasures! Your mission: to clean them safely for little hands. Here's your battle plan:
First, wash items with warm, soapy water. Scrub-a-dub-dub! Then, rinse thoroughly. For tougher foes, mix water and vinegar – it's a germ-fighting duo! Don't forget to disinfect with a mild bleach solution. Rinse again and air dry completely. You've conquered the germ kingdom! Now your recycled goodies are ready for tiny artists to transform into masterpieces. Let the creative adventures begin!
Are There Any Recycled Materials That Should Be Avoided for Toddlers?
You bet there are materials to avoid for toddlers! Stay away from anything sharp, like tin cans or broken glass. No small items they might swallow, such as bottle caps or tiny plastic pieces. Avoid materials with toxic residues, like chemical containers. Steer clear of anything with mold or strong odors. And don't use items that've held raw meat or eggs – yuck! Safety first, always! By being cautious, you'll guarantee your little artists have a blast without any worries!
How Can I Incorporate Learning Objectives Into These Recycled Art Projects?
You can totally make learning fun with recycled art! Incorporate counting by sorting materials, or practice colors during painting. Use shapes to teach geometry, and build fine motor skills through cutting and gluing. Why not try letter recognition with bottle cap alphabets? Or investigate science by discussing material properties! And don't forget storytelling – create characters from recyclables and let imaginations soar! With a little creativity, you'll turn trash into educational treasure. It's a win-win for learning and the environment!
What Are Some Age-Appropriate Tools for Toddlers to Use in Recycled Art?
You've got so many exciting options for toddler-friendly art tools! Let's start with the classics: chunky crayons and washable markers are perfect for little hands. But don't stop there! Try foam brushes, finger paint, and plastic cookie cutters for stamping. And here's a fun twist: use safety scissors (with supervision) to snip paper. For messy fun, squeeze bottles and sponges are fantastic! Remember, big tools are best for tiny artists. Get creative and watch those imaginations soar!