Get ready for some nature-inspired fun, little adventurers! You’ll love these 3 awesome collage ideas. First up, create a lively Leaf and Flower Mosaic using colorful finds from your backyard. Next, design a Stick and Stone Picture by arranging twigs and pebbles into cool shapes on cardboard. Finally, try Bark Rubbings scenery – it’s like magic! Just rub crayons on paper against tree bark to capture amazing textures. These projects are perfect for developing fine motor skills and releasing your creativity. Plus, you’ll get to enjoy the great outdoors during the process of making beautiful art. Excited to learn more about these nature-tastic crafts?
Creative Highlights
- Leaf and Flower Mosaic encourages creativity using colorful natural materials on canvas or paper.
- Stick and Stone Picture allows children to create imaginative scenes using found objects on sturdy bases.
- Bark Rubbings Landscape develops fine motor skills while exploring tree textures and creating unique artworks.
- These nature collages promote outdoor exploration, sensory experiences, and environmental awareness for young children.
- Each activity is adaptable to different age groups and can be easily implemented with minimal supplies.
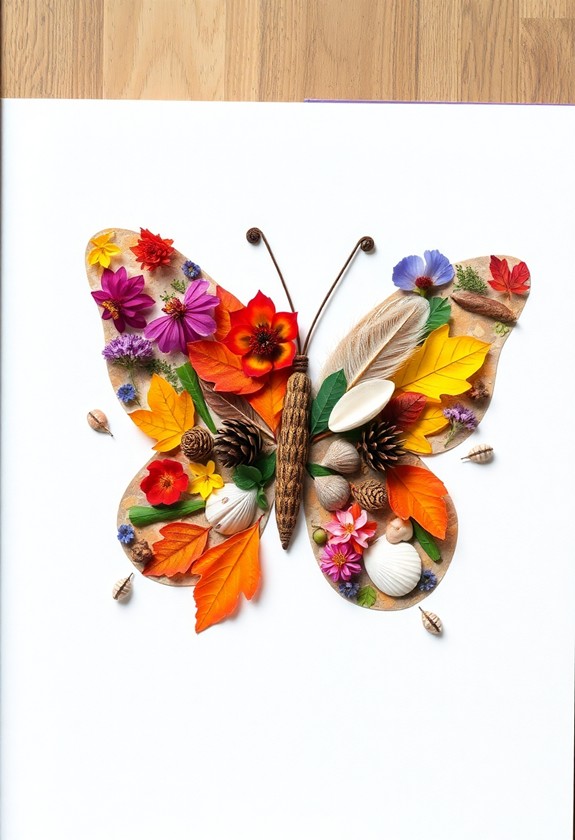
Leaf and Flower Mosaic
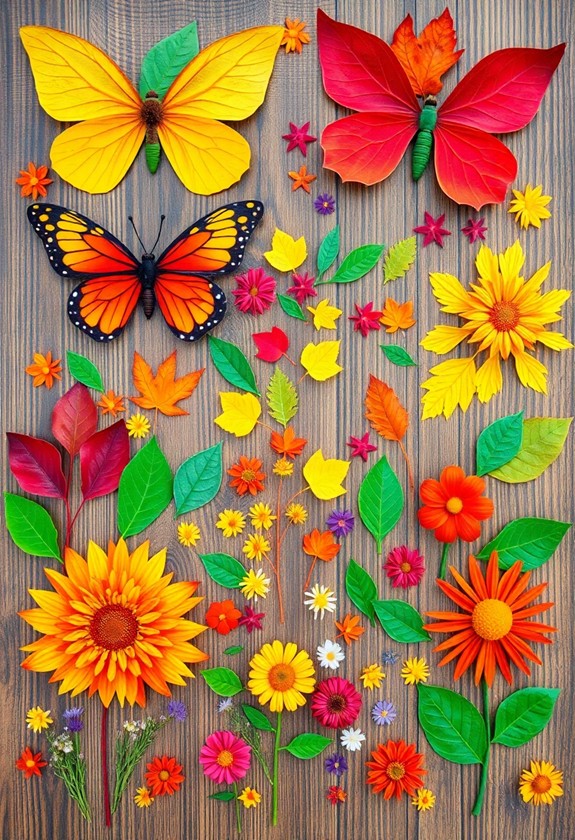
A mosaic of bright leaves and delicate flowers can transform a plain canvas into a stunning work of art. It’s time to release your inner artist and create a masterpiece! Here’s how to get started:
- Gather your materials:
- Canvas or sturdy paper
- Glue
- Colorful leaves and flowers
- Plan your design – think rainbows, animals, or scenery!
- Start sticking! Arrange your nature finds in eye-catching patterns.
- Layer different shapes and colors for depth and texture.
- Don’t forget to press everything down firmly.
This activity not only boosts fine motor skills but likewise encourages problem-solving as children decide where to place each leaf or flower. It’s a fantastic way to bond with grandparents as you create lasting memories.
Voila! You’ve just made a leaf-tastic creation! This activity is perfect for rainy days or sunny afternoons. It’s a great way to appreciate nature’s beauty up close. Plus, it’s a wonderful opportunity to learn about different plant species. So, grab your glue and get ready to turn over a new leaf in art!
Stick and Stone Picture
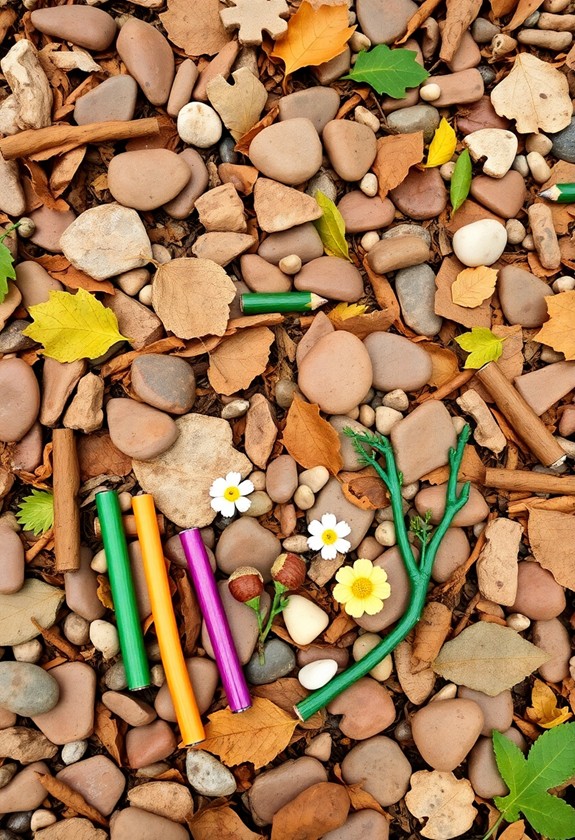
Creativity knows no bounds in relation to natural art materials. For this exciting project, you’ll use sticks and stones to create a unique picture! Start by gathering various sizes of twigs and pebbles from your backyard or local park.
Next, grab a piece of sturdy cardboard or wood as your canvas. It’s time to let your imagination run wild! Arrange your sticks to form the main shapes of your picture. Maybe it’s a house, a tree, or even an animal! Use smaller twigs for details like branches or whiskers.
Now, add stones to your masterpiece! They can be:
- Clouds in the sky
- Flowers on the ground
- Eyes for your stick figure
Glue everything in place, and voila! You’ve created a stick and stone picture that’s totally unique and bursting with natural beauty. Mother Nature would be proud!
Bark Rubbings Landscape
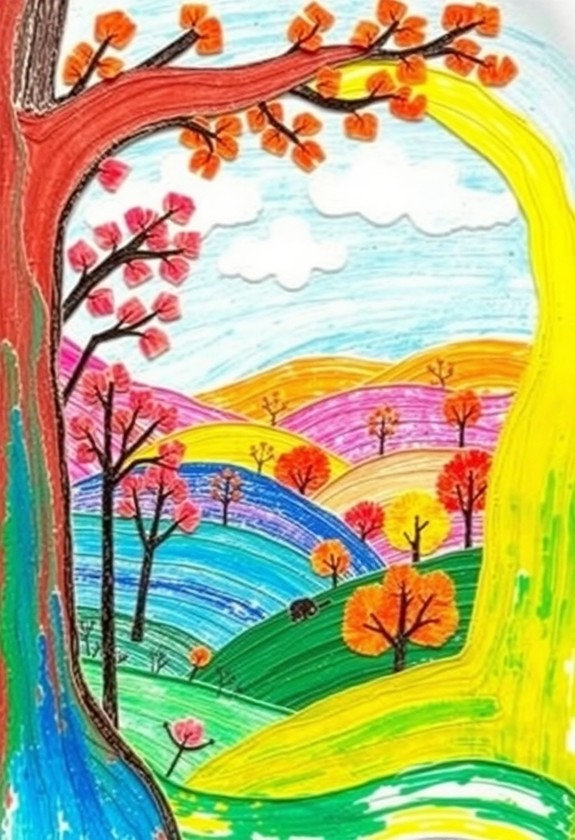
In spite of its simplicity, bark rubbing can create stunning scenery art. It’s a fantastic way to capture nature’s textures and bring them to life on paper! You’ll love how easy and fun it is to make your own bark rubbing scenery. Just grab some paper, crayons, and head outdoors to find interesting tree bark textures. This activity promotes skill development in fine motor skills and color recognition, making it perfect for toddlers and young children.
Here’s what you’ll need:
- Paper (plain white works best)
- Crayons with paper removed
- Various tree bark surfaces
- Clipboard or hard surface to work on
- Imagination!
Start by placing your paper against a tree trunk and gently rub the crayon across it. Watch as the bark’s unique pattern magically appears! Mix and match different bark textures to create mountains, forests, and even water. Let your creativity run wild! You’ll be amazed at how your scenery comes to life with these natural impressions.
Curious Little Questions
How Can I Preserve Nature Collages for Long-Term Display?
Want to keep your nature collages looking fresh forever? You’re in luck! Here are some awesome preservation tricks:
- Spray it with a clear sealant – it’s like magic armor for your art!
- Press it between wax paper and heavy books – squish that beauty flat!
- Frame it behind glass – give it the VIP treatment!
- Use UV-resistant glue – sun-proof your masterpiece!
What Adhesives Are Safe for Children to Use With Natural Materials?
Sticky and safe, natural and neat! You’ve got options for your little nature artists. Try these kid-friendly adhesives:
- White school glue: It’s a classic! Dries clear and works well.
- Glue sticks: No mess, no fuss! Perfect for paper and leaves.
- Flour paste: Mix flour and water – voila! An eco-friendly option.
- Low-temp glue guns: With adult supervision, they’re great for heavier items.
Are There Any Poisonous Plants to Avoid When Collecting Materials?
You’ve got to be careful when collecting plants for your nature projects. Some can be harmful if touched or eaten. Watch out for:
- Poison ivy – leaves of three, let it be!
- Poison oak – similar to poison ivy, but with rounded leaves
- Poison sumac – reddish stems with pointy leaves
- Wild parsnip – yellow flowers, can cause nasty burns
Always ask an adult if you’re unsure! It’s better to be safe than sorry. Stick to familiar, non-toxic plants like dandelions, daisies, and pine cones for your awesome nature collages!
How Can I Incorporate Nature Collages Into School Projects?
Immerse yourself in a world of leafy learning! You can weave nature collages into school projects like a pro. Here’s how:
- Make a seasons poster: Show how plants change throughout the year!
- Create a habitat diorama: Use natural materials to build mini-ecosystems
- Design a leaf alphabet: Find leaves that look like letters
- Craft a “My State” collage: Showcase local flora
And don’t forget, you can press flowers for science projects or make bark rubbings for art class. Nature’s your classroom now, so get out there and investigate!
What Age Groups Are These Nature Collage Activities Suitable For?
Nature collages are fantastic for all ages! You’ll find they’re perfect for:
- Preschoolers (3-5): Simple, sensory exploration
- Elementary kids (6-11): More complex designs, learning about nature
- Middle schoolers (12-14): Artistic expression, scientific observation
- High schoolers (15-18): Advanced techniques, environmental awareness
Even adults can join the fun! It’s a versatile activity that grows with you. Start ’em young, and watch their creativity bloom! Remember, there’s no age limit on enjoying nature’s beauty and creating art. Let’s get collaging!